Wood Stove
Difficulty
Time Spent
2 Days
Main specs for American yurt companies (organized alphabetically). Updated December 2019. Pacific Yurts declined to provide information for this website.
Yurt Company Acronym Key
- BR = Blue Ridge Yurts
- CY = Colorado Yurt
- GL = Great Lakes Yurt Co
- LI = Living Intent Yurt Co
- NS = Nomad Shelter
- RO = Rainier Outdoor
- SD = Shelter Designs
- YA = Yurts of America
Company Contact
| Company | Website | Phone Number | |
|---|---|---|---|
| BRBlue Ridge Yurts | blueridgeyurts.com | [email protected] | (540) 745-7458 |
| CYColorado Yurt | coloradoyurt.com | [email protected] | (800) 288-3190 |
| GLGreat Lakes Yurt Co | greatlakesyurtco.com | [email protected] | (269) 808-3664 |
| LILiving Intent Yurt Co | livingintentyurts.com | [email protected] | (207) 350-9457 |
| NSNomad Shelter | nomadshelter.com | [email protected] | (907) 235-0132 |
| RORainier Outdoor | rainieroutdoor.com | [email protected] | (866) 483-6795 |
| SDShelter Designs | shelterdesigns.net | [email protected] | (406) 721-9878 |
| YAYurts of America | yurtsofamerica.com | [email protected] | (317) 377-9878 |
Company Details
| Company | Location | Year First Yurt Sold | Tour Available? |
|---|---|---|---|
| BRBlue Ridge Yurts | Floyd, VA | 2004 | |
| CYColorado Yurt | Montrose, CO | 1980 | |
| GLGreat Lakes Yurt Co | Grass Lake, MI | 2017 | — |
| LILiving Intent Yurt Co | Grass Valley, CA | 2015 | |
| NSNomad Shelter | Homer, AK | 1987 | |
| RORainier Outdoor | Tukwila, WA | 2004 | |
| SDShelter Designs | Missoula, MT | 2005 | |
| YAYurts of America | Indianapolis, IN | 1986 | — |
Yurt Info
| Company | Available Sizes | Max Snow Load* | Base Cost of 30' | Base Cost of 16' |
|---|---|---|---|---|
| BRBlue Ridge Yurts | 16', 20', 24', 30' | 60 psf | 60 psf | $13,047 | $7,299 |
| CYColorado Yurt | 16', 20', 24', 27', 30' | 15 psf | 95 psf† | $12,240 | $7,090 |
| GLGreat Lakes Yurt Co | 16', 20', 24', 27', 30' | 75 psf | 75 psf | $11,000 | $5,000 |
| LILiving Intent Yurt Co | 12', 14', 16', 20' | — | — | $6,000 |
| NSNomad Shelter | 12', 16', 20', 24', 30', 34', 40', 50' | 60 psf | 60 psf | $15,500 | $8,000 |
| RORainier Outdoor | 16', 18', 21', 24', 27', 30', 33' | 100 psf | 105 psf† | Eagle: $18,820, Raven: $13,358 | Eagle: $9,466, Raven $7,426 |
| SDShelter Designs | 12', 16', 20', 24', 27', 30', 35', 40' | 40 psf | 150 psf | $12,480 | $6,760 |
| YAYurts of America | 12', 14', 16', 20', 30' | 60 psf | 95 psf | $12,000 | $6,499 |
*(30' yurt without upgrades | 30' yurt with all upgrades), †Site specific engineering available for higher snow loads
Rafter Details
| Company | Wood Species | Base Rafter Size for 30' |
|---|---|---|
| BRBlue Ridge Yurts | Spruce | 2x6 |
| CYColorado Yurt | Doug Fir | 2x4 |
| GLGreat Lakes Yurt Co | Doug Fir | 2x6 |
| LILiving Intent Yurt Co | Doug Fir | — |
| NSNomad Shelter | Spruce | 2x6 |
| RORainier Outdoor | Doug Fir | 2x6 |
| SDShelter Designs | Western Tamarack (Larch) | 2x6 |
| YAYurts of America | Southern Yellow Pine | 2x6 |
Lattice Details
| Company | Wood Species | Lattice Thickness | Base Height of Wall |
|---|---|---|---|
| BRBlue Ridge Yurts | Poplar | 3/4" | 7' 4" |
| CYColorado Yurt | Doug Fir | 1/2" | 7' 2" |
| GLGreat Lakes Yurt Co | Doug Fir | 1/2" | 7' 4" |
| LILiving Intent Yurt Co | Bamboo | 1/2" | 6' 9" |
| NSNomad Shelter | Spruce | 7/8" | 7' |
| RORainier Outdoor | Doug Fir | 3/4" | 7' 4" |
| SDShelter Designs | Doug Fir | 7/16" | 7' 2" |
| YAYurts of America | Poplar | 3/4" | 7' |
Available Upgrades
| Company | Insulation |
Thick Roof Cover |
French Doors |
SIP Panels |
Glass Windows |
Awnings |
Rain Diverter |
Opening Dome |
Tinted Dome |
Water Catchment |
Wind & Snow Package |
10ft Walls |
Swappable Walls |
|---|---|---|---|---|---|---|---|---|---|---|---|---|---|
| BRBlue Ridge Yurts | — | — | — | ||||||||||
| CYColorado Yurt | — | — | — | ||||||||||
| GLGreat Lakes Yurt Co | — | — | — | — | — | — | — | — | — | — | |||
| LILiving Intent Yurt Co | — | — | — | — | — | — | — | — | |||||
| NSNomad Shelter | — | — | — | — | — | — | — | — | — | — | — | ||
| RORainier Outdoor | — | ||||||||||||
| SDShelter Designs | — | — | |||||||||||
| YAYurts of America | — | — |
Final Details
| Company | Lead Time | Shipping Available | Financing Available | On-site Construction Services | International Purchasing |
|---|---|---|---|---|---|
| BRBlue Ridge Yurts | 3-4 weeks | — | — | ||
| CYColorado Yurt | 5-8 weeks | ||||
| GLGreat Lakes Yurt Co | 6-8 weeks | — | — | ||
| LILiving Intent Yurt Co | 7 weeks | — | |||
| NSNomad Shelter | 6-12 weeks | ||||
| RORainier Outdoor | 3-7 weeks | ||||
| SDShelter Designs | 4-6 weeks | — | |||
| YAYurts of America | 2-5 weeks |
With the thin walls of a yurt, cold outdoor temperatures have a way of creeping inside. A wood stove becomes a godsend during winter months.
Choosing a wood stove
Wood stoves are another element with a broad spectrum of options. You can choose between different fuel sources (wood logs, pellets or gas) and an endless supply of stylistic choices. From the ornate behemoths fit for a log cabin to the sleek, contemporary wood stoves perfect for modern living, there seems to be something for everyone.
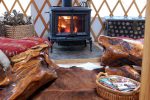
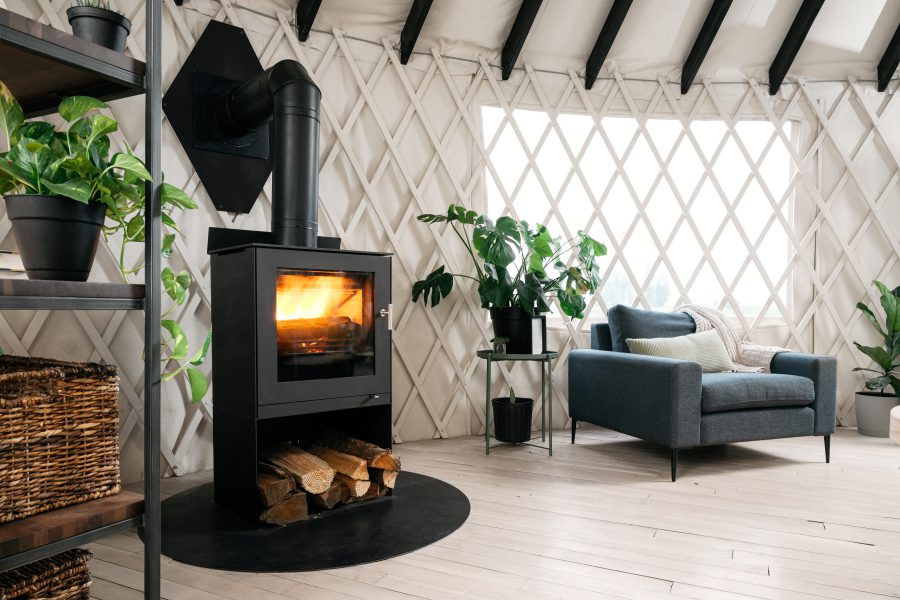
We decided to install the Q-Tee II stove from Rais, a Danish brand. The minimalist design matched the rest of our Scandinavian inspired interior while also being extremely clean-burning, emitting only 0.9g/hr. The stove is rated to heat 1400 sq ft in a normal house. Because of our reduced insulation and tall ceilings, this would be at the cusp of what is needed to heat a 30-foot yurt. We’ve had many lovely nights relaxing next to this fire.
Make hearth
With an object that puts out as much heat as a wood stove, you will want to protect the surroundings from taking to much of that heat and potentially starting a fire. This includes the floor. By making a non-flammable barrier (called a hearth) for the stove to sit on, we can mitigate almost all of that risk. Hearths can be made of stone, concrete or metal. Because our stove is elevated above the ground, our hearth could be a thin sheet of aluminum that extends to the recommended size.
Very simple to make. Trace a circle onto the aluminum using a string line and cut with a fine-toothed jigsaw. I decided to paint mine a matte black with some high-temperature spray paint. If required, you may also need to build a heat shield along the wall behind the wood stove.
Move wood stove in place
The exact placement of the stove will depend on the specific stove you purchased. Some have better-protected fire boxes allowing closer placement to walls or furniture.
Most yurt manufacturers actually recommend the wood stove be placed along the exterior wall so that the stove pipe can exit through the wall instead of the roof. This is because, if installed properly, there is less of a risk for leaks in a wall installation. In many cases, installing the chimney through the roof fabric will actually void the warranty of the roof itself.
Install flashing
Stove pipe that exits through a wall will require metal flashing to be installed. This helps protect the lattice and fabric from the heat of the stove pipe. The first step is to measure exactly where the stove pipe will exit within a cross-section of lattice. You’ll then trace a circle the size of your stove’s wall thimble on the surrounding lattice. Cut with a saw. You’ll do the same with the interior and exterior wall panels. Cut with an x-acto knife.
Ensure the flashing provided by the yurt company has a hole that fits your wall thimble. I had to cut mine larger with a jigsaw. Screw both flashing pieces into the lattice. Ensure the exterior flashing sits underneath the roof’s drip edge. This will prevent water from leaking inside. Slip your chimney’s wall thimble into place and screw to secure. You may need to shorten the length of the wall thimble to fit properly. Caulk the edges of the exterior flashing with high-temp silicone caulk.
Create chimney support pole
Unlike installing a chimney on a house, we can’t support the weight of our chimney with brackets that attach to the roof or wall of our yurt. The fewer holes in our vinyl the better. The solution for this is to build a tall support adjacent to the chimney that is embedded into the ground. The most common method of achieving this is with two massive 4×4 posts. I do not like the bulky look of this. Instead, we’ll be using a 20 ft galvanized steel pipe 2 inches in diameter to support our chimney. This slick setup was inspired by Jafo’s build over on Yurt Forum.
Our pipe was embedded into a 3ft deep concrete form. I built three wooden struts to prop up the pipe as the concrete dried. Next came the fun part. In order to attach the chimney to the pipe, custom supports needed to be fabricated. Each of these pieces consists of a pipe clamp around the pole which is also secured to a piece of unistrut cut down to size (about 1 foot). The unistrut allowed us to attach various support pieces from Duravent. This includes the tee support bracket and wall straps. Steel bars were cut to a small rectangular shape and holes drilled that lined up with the holes in the Duravent components. This allowed us to clamp the support components to the unistrut with nuts, bolts, and washers. Quite a bit of extra work, but looks very clean and functions well.
Install chimney
While stove pipe is designed for your interior, chimney pipe is manufactured to withstand the elements outside. Like stove pipe, you’ll have a number of options to choose from. For materials, you can buy either galvanized steel or the more expensive and more corrosion-resistant stainless steel. Chimney pipe also offers varying wall thicknesses. You’ll be looking for Class A double wall chimney pipe or Class A triple wall chimney pipe. We chose triple walled thickness because it reduces the minimum space from the chimney to the yurt’s exterior cover to just 2 inches.
Our chimney pipe is from Duravent. It installs with a simple lock and twist mechanism. No screws. Ensure you are buying the proper diameter chimney pipe. Ours is 6 inches. These are the required parts for your chimney starting from where we left off with the stove pipe:
- 18 in chimney pipe: Connecting to your finish collar, this will start 6 inches on the inside of the yurt, go through the wall thimble and connect to the tee on the outside.
- Wall thimble: Mentioned previously, this piece is not necessarily part of the chimney but is part of the wall flashing in the wall to protect the yurt from the chimney’s heat.
- Tee section:This serves as a fancy 90-degree elbow for the chimney pipe. There is a cleanout on the very bottom to allow for easy routine chimney cleaning.
- 2x 5ft chimney pipe (totaling 10ft):To determine the height of your chimney keep in mind that your chimney should extend 2ft higher than anything within 10 ft of it including the roof. Using that as a reference we calculate we would need a 10ft chimney (two 5 foot sections).
- Vertical cap w/ spark arrestor: The crown on the very top of the chimney is designed to prevent water or large critters from entering the chimney. The spark arrestor will help prevent any stray embers or hot ash from escaping outside.
Install stove pipe
Getting your wood stove is only half of the equation. You’ll still need to purchase all the pieces that allow the smoke to exit your living space. There’s a lot of different options and brands out there, so it can become quite overwhelming when shopping. Your stove will connect to the stove pipe inside the yurt. The stove pipe will transition to chimney pipe as it exits outside and continues above your yurt where it is released. Stove pipe is offered in single wall and double wall thickness. Double wall thickness will insulate the heat better allowing closer installation to walls. We opted for the double wall pipe.
There is no mixing of different brands for your stove and chimney pipe. They all have their own method of connecting their products together and they are not cross-compatible. All of our pieces are from Duravent which is the leading venting company in the US. Their DVL stove pipes connect together with slots and screws. The specific lengths can vary quite a bit and will be determined by the height and position of your wood stove. You will most likely be using 6-inch diameter stove pipe. The pieces of your stove pipe will include:
- Adapter: this will connect your stove to your stove pipe. This has the option to come with a damper, which is not needed for the Q-Tee II.
- 18in stove pipe: This pipe continues from the adapter upwards to the height of your exit (minus the elbow). This comes in an adjustable version if your height does not fit within one of the fixed lengths.
- Elbow: This 90-degree piece will turn the vertical pipe into the horizontal pipe for the exit. It can be adjusted slightly for the proper angle.
- 12in stove pipe: This pipe will extend horizontally six inches short of the yurt’s exterior wall.
- Finish collar: This piece serves as the adapter connecting the stove pipe to the chimney pipe.
Warm up!
No more cold toes! Throw in a few logs and get toasty. Clean chimney at regular intervals to avoid any fiery mishaps. Also, make sure the wood you are burning has seasoned (dried) at least a year with a moisture content around 15%. There’s a lot of shady firewood sellers out there. Stay vigilant! Don’t get tricked into buying green wood.
Previous Chapter

Plumbing
Next Chapter
